A Simple Guide to CSS Selector Specificity - Squarespace 7.1
What is CSS Specificity?
CSS specificity is like a ranking system that determines which style declaration is ultimately applied to an element. If there are two or more CSS rules using selectors that point to the same element, the selector with the highest specificity value will “win,” and its style declaration will applied to that HTML element.
Hopefully, if you’re reading this article, you already know about the different types of CSS selectors, including class selectors, ID selectors, attribute selectors, pseudo-element selectors, pseudo-class selectors, and inline CSS.
If you don’t know anything about selectors, you can learn all about the most commonly used ones (class and ID selectors) on day 3 & 4 of my free 6-day CSS crash course for Squarespace.
CSS Order Matters (Crucial Prerequisite)
Before we start our discussion about specificity, we need to go over why the order of CSS matters - otherwise the rest of this article won’t make much sense.
CSS stands for Cascading Style Sheet. The term cascading implied that CSS is read in the downward direction - from top to bottom. Because if this, the CSS that is further down the stylesheet will be read last.
So what does this mean in terms of specificity? It means that if two CSS selectors have the same level of specificity, the one that appears last in the CSS file is the one that will ultimately be applied.
Example 1
In the below example, we have two element selectors, both with the same level of specificity (we’ll go over how to calculate specificity in the next section).
The one that comes last is the one that will be applied, therefore all heading 1 elements will be blue instead of red.
h1 { /* 0,0,0,1 */
  color: red;
}

h1 { /* 0,0,0,1 */
  color: blue; /* This one wins since it comes last. */
}
How to Calculate CSS Specificity
Luckily, we have access to tools like the Specificity Calculator so that we don’t have to worry about manually calculating specificity of CSS selectors, but you still need to know the process that goes into finding CSS specificity.
Here’s how it works:
Diagram Explanation
Pictured below is a diagram that shows the order of specificity of different CSS selectors.
The order starts from the highest specificity to the lowest starting from left to right:
Inline: Most specific
ID: Second-Most specific
Classes, Attributes & Pseudo-Classes: Third-most specific
Elements & Pseudo-Elements: Least specific
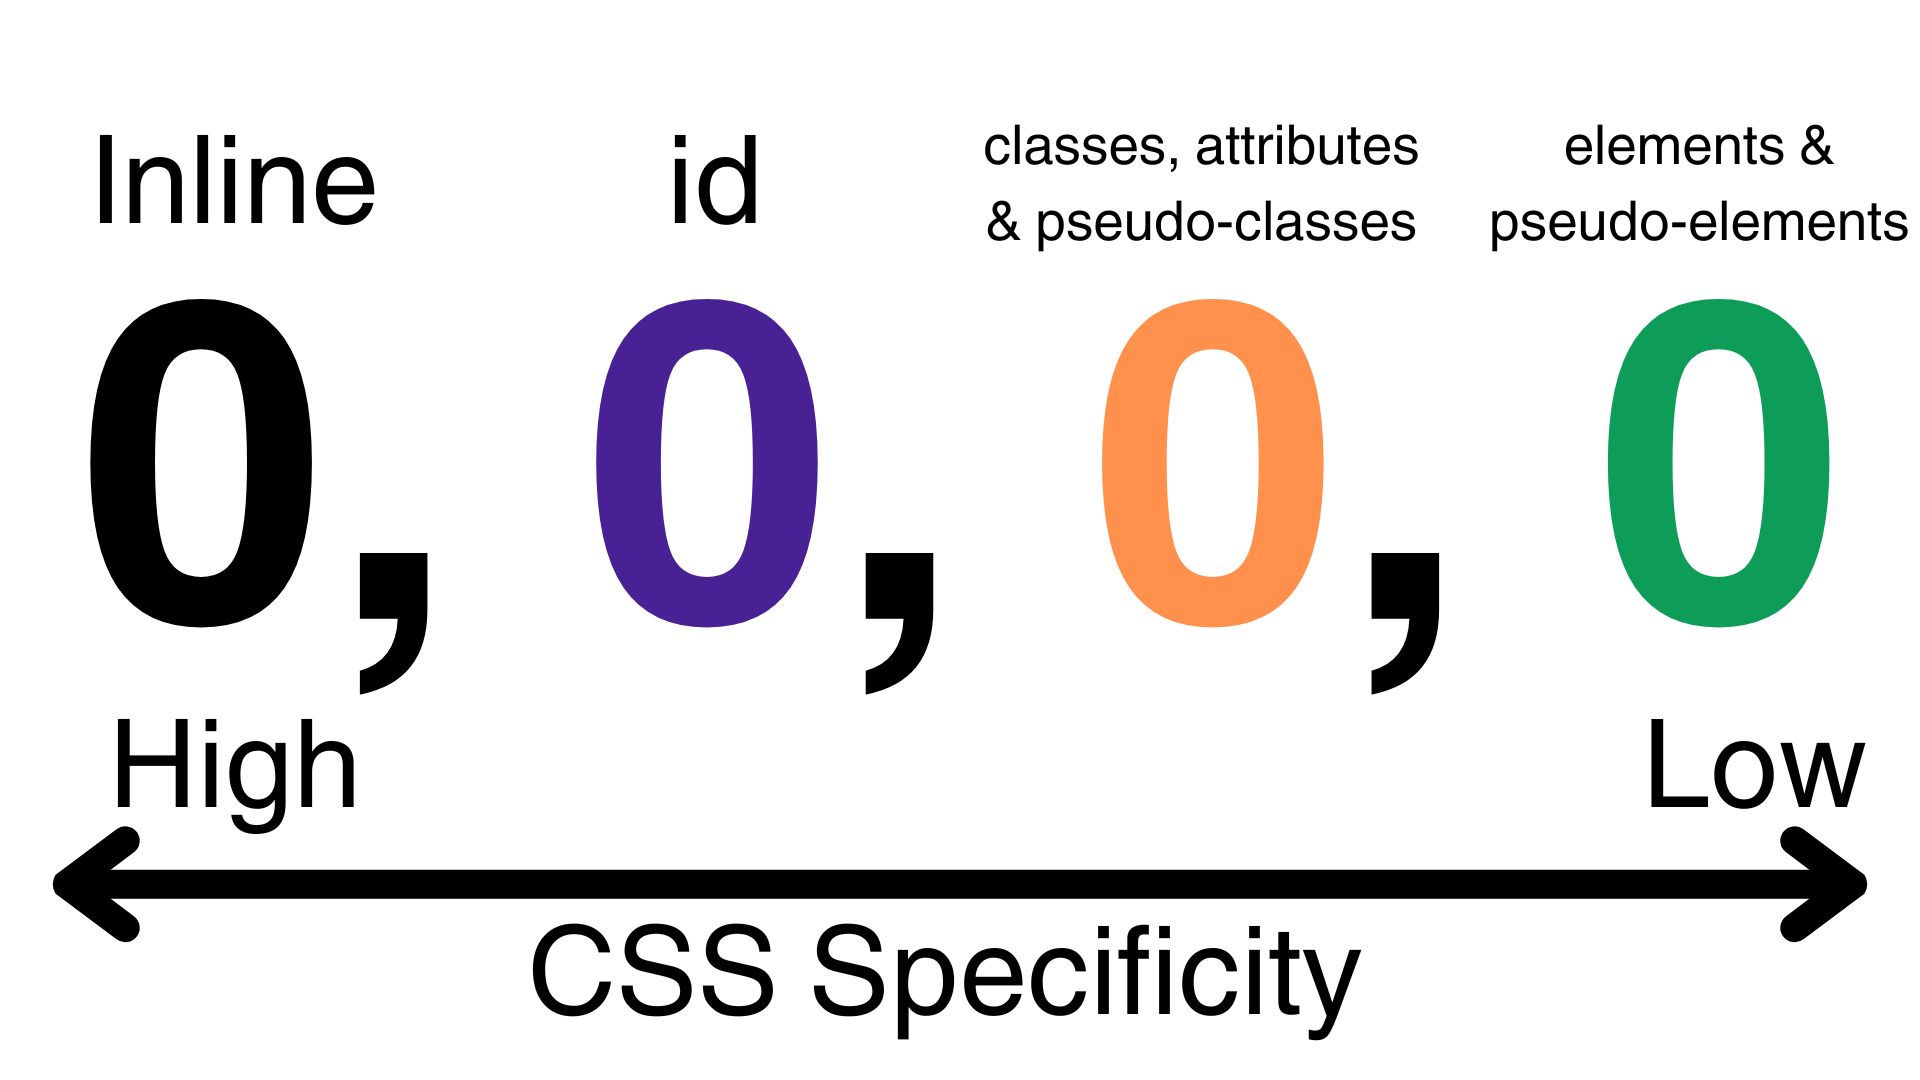
Think of the four number places separated by commas as a tally system. Each value will represent how many of each type there are in the selector.
Think of it as a race between the number values to see who can reach the highest value first, starting from the left to the right.
Example 2
In the below example, there are two CSS rules targeting the same element.
The first one has a specificity of "0,0,1,0" since it has one class selector and one element selector.
The second one has a specificity of "0,0,0,1" since it has one element selector.
When we compare each of the number values, we find that the third number value in the first selector reaches a higher value first, so we can ignore the rest and declare the first CSS rule as the winner.
Notice that the natural order of the CSS does not matter in this case because the first selector is more specific.
<p class="highlight">Hello, World!</p>

<style>
  .highlight { /* 0,0,1,0 */
    background: yellow; /* This one wins since it has a higher specificity. */
  }
  p { /* 0,0,0,1 */
    background: lightpink;
  }
</style>
Example 3
In the below example, there are three CSS rules targeting the same elements.
The first one has a specificity of "0,1,1,0" since it has one ID selector and one class selector.
The second one has a specificity of "0,0,2,0" since it has two class selectors.
The third one has a specificity of "0,0,0,1" since it has one element selector.
When we compare each of the number values, we find that the second number value in the first selector reaches a higher value first, so we can ignore the rest and declare the first CSS rule as the winner.
<p class="text paragraph" id="highlight">Hello, World!</p>

<style>
  #highlight.text { /* 0,1,1,0 */
    background: yellow; /* This one wins since it has a higher specificity. */
  }
  .text.paragraph { /* 0,0,2,0 */
    background: lightblue;
  }
  p { /* 0,0,0,1 */
    background: lightpink;
  }
</style>
Example 4
Inline CSS is the most specific CSS selector, so it will win all the time unless it is overwritten by an "!important”" rule.
<!-- 1,0,0,0 The inline style here wins. -->
<p style="background: lightblue;" class="highlight">Hello, World!</p>

<style>
  .highlight { /* 0,0,1,0 */
    background: yellow;
  }
  p { /* 0,0,0,1 */
    background: lightpink;
  }
</style>
The "!important" Rule
The !important rule basically overrides every other CSS selector, even inline styles. It’s like you’re saying, this rule is more important than all of the other CSS rules.
We’ll go over the pros and cons of such a powerful rule as this in the next section of this article, but for now, let’s go over how to use and override the !important rule.
The only way to override an !important rule is write a CSS selector with the same level of specificity as the one that uses the !important rule, and then add the !important rule to it.
Example 5
In the below example, the paragraph will be yellow because even though the second CSS rule uses and !important tag, it uses a less specific CSS selector than the first one.
<p class="highlight paragraph text">Hello, World!</p>

<style>
  .highlight { /* 0,0,1,0 */
    background: yellow !important; /* This one wins since it has a higher specificity. */
  }
  p { /* 0,0,0,1 */
    background: lightpink !important;
  }
</style>
Example 6
In the below example, we’ve added a class selector to the second CSS rule in the previous example. Because the two selectors now have matching levels of specificity in congruence with the !important rule, the second selector overrides the first, making the paragraph lightpink.
<p class="highlight paragraph text">Hello, World!</p>

<style>
  .highlight { /* 0,0,1,0 */
    background: yellow !important;
  }
  p.highlight { /* 0,0,1,1 */
    background: lightpink !important; /* This one wins since it has a higher specificity. */
  }
</style>
Best Practices for CSS Specificity in Squarespace
1. Use the order that CSS is written to your advantage.
We don’t always have to rely on making selectors more specific.
As mentioned earlier, the order in which you write CSS matters because if you have two CSS rules using selectors with the same level of specificity, the one that is most recent in the CSS file will ultimately be applied. This means we can manipulate the order in which our CSS is written to get our desired result without cluttering up our CSS with overly specific CSS selectors.
2. Use low-specificity CSS selectors when possible for manageable code.
Making CSS selectors as simple as possible can make your CSS way easier to read and edit.
What’s wrong with CSS selectors that are too specific?
CSS selectors that are too specific can cause sloppy code that is hard to read and edit properly, and it can cause problems when you try to write more code in the future. When you use highly specific selectors all the time, it can creep up over time causing future overrides to not work. Ultimately, you end up fighting against your own code because there is not enough room for more specific CSS selectors.
Now if you have some experience with the !important tag, which basically overrides everything, you might be thinking, “I can just throw an !important tag here and be done with it!”
WRONG!
If you keep using this as a strategy for overriding previous CSS rules, you’ll eventually get to a point where you can’t write any more code to style a specific element without getting even more specific with your code, at which point you can see how the sloppiness builds up over time.
If you need more practice figuring out how to go about writing low-specificity CSS selectors in Squarespace, I go into full detail about this very topic among other Squarespace CSS-related topics in The Functional CSS Course for Squarespace.
How to write simple CSS selectors
Low specificity selectors refer to CSS selectors that are as simple as possible. This means using minimal descendant selectors (select elements nested within an element) and chained selectors (select elements with multiple attributes or classes) unless absolutely necessary.
Sometimes, using really specific CSS selectors is unavoidable, because since Squarespace already has a lot of pre-built CSS style sheets that use !important rules and other highly specific CSS selectors, we will sometimes be forced to use highly specific selectors. Still, a good rule of thumb is to make your selectors as simple as possible, and only use the !important rule when you absolutely need to.
To make your selectors as simple as possible, I recommend using Chrome DevTools to view what selector is currently being given precedence to the CSS property you’re hoping to override, and then write a selector in your Custom CSS editor that matches that specificity exactly. This way, you will be sure to override the property.
3. Try not to overuse the !important rule.
The !important rule basically overrides every other CSS selector. It’s like you’re saying, this rule is more important than all of the other CSS rules.
Now, after defining what the !important rule does, and after reading the previous point about keeping CSS selector specificity as low as possible by not over-qualifying selectors, you might be thinking “I can just throw an !important tag here and be done with it. Then, I won’t have to worry about making my CSS selectors the perfect level of specificity.” Well, that’s not exactly the best approach, either.
If you keep using the !important rule as a strategy for overriding previous CSS rules, you’ll eventually get to a point where you can’t write any more code to style a specific element without getting even more specific with your selectors, at which point you can see how the sloppiness builds up over time and the maintainability of your code suffers.
There are only 2 scenarios where using the !important rule is justifiable: when you need to override an inline-style of an element, or when you need to override another !important rule that’s already being applied. You’ll likely encounter both of these scenarios when writing CSS in Squarespace, because the platform already has a bunch of CSS that is built into each template.